There are hundreds of different kumihimo stitches, some simple and some very complex, using different numbers of strands.
A common stitch often taught to beginers is the simple 16-thread rotating stitch (Kongo Gumi). The pattern you get depends
on how the strands are arranged at the start. In our directions, "strand" can be ribbon, yarn, fun/fancy fur or something else.
Cutting your strands (ribbon, yarn, string, etc.)
- First determine the length you want to start with. Because I like to use our River Silk ribbon, I will take one 5.5 yard spool and cut it in half, and then fold both pieces in half,
giving me two 99 inch (8.25 feet) strands, or four 49.5 inch (4.125 feet) strands when folded in half.
-
Cut your first strand (remembering it will be folded in half).
-
One at a time, cut the rest of the strands to the exact same length (unless some are stretchy and can be a little shorter). For this example we will use 8 strands folded
in half to make 16 strands hanging down (4 across all around). Remember all braids must be divisible by 4 (e.g. 4, 8, 12, 16, 20). The most I have done is 5x4 (20).
The more strands you use the thicker your braid will be.
Threading your disc:
-
Hold the two ends of your first strand between your thumb and forefinger so they are even and find the halfway fold.
-
One at a time, add the rest of the strands until all 16 (8 strands folded in half) are between your thumb and forefinger.
-
Now you'll want to tie the strands all together in a single knot. Make sure none of the threads is outside the knot.
I like to use a separate small piece of yarn or ribbon to loop through the folds, which I then tie in a double knot to hold them all together.
-
Holding the disc, push the knot through the hole of the disc and hold the strands there with one hand under the disc.

-
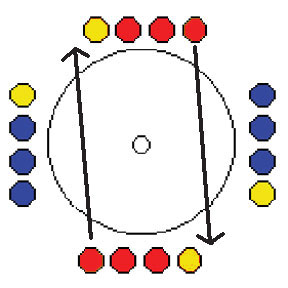
As you hold the knot with one hand, with the other hand, arrange the strands, pulling them into the slots on the disc so they look similar to the picture above.
Seat each strand into the slot so they are taut.
Note that there are 4 groups of strands and that the pairs are across from each other. You will work with two pairs at a time, and they
should be across from each other.
This color combination was chosen so you can see easily how to move the strands. You can arrange your strands in any color combo you choose.
-
Pick a strand on the left of any of the groups to start with (it doesn't matter which). Hold the disc so the strands of that color are on the top and bottom.
(similar to picture above)
Begin your braid.


- Take the lower left-hand strand and remove it from the slot, lift it straight up (not across) and put it in the slot directly above
(to the left of the upper strands as illustrated in the picture above).
- Next, take the upper right-hand strand, lift it out and pull it down into the slot to the right of the lower strands
(illustrated in the same picture).
- You just made your first stitch in the braid.
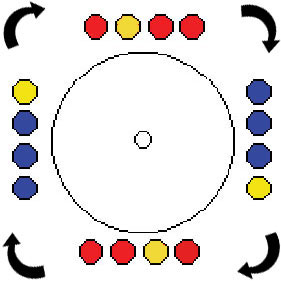
- Now, rotate the disc clockwise so the next strands are at the top and bottom. If it feels more natural for you to turn the disc counter-clockwise instead of clockwise,
that is okay as long as you are consistent and do it the same each time. Otherwise the pattern in your braid will vary.


- Repeat steps 1-4 until finished (when your yarn or ribbon is too short to stay in the slot).
See the next few illustrations above to note how the exact same procedure is followed for the entire braid. If you have to lay down your
braid and come back to it later and aren't sure where you left off, here's how you know. Look at the strands and note which groups have
strands on top. Start with the other group (if the colors are the same it doesn't matter which side as the net effect will be the same.
However if the colors are arranged differently your pattern could change). The best thing to do is to stop halfway (after you pull
the left strand up, before pulling the right strand down).
- You'll probably want to peek under the disc after you've been braiding about five or ten minutes to see your braid beginning to emerge. It is fun to peek every
so often and watch your braid grow! If the strands shift you may move the strands (as a team) over 1 spot so the pairs are
still straight across from each other if they get off a bit during the braidmaking.
- To finish your braid, pull the strands out of the disc, and tie a single knot close to the braid. Make sure you get
all the strands inside the knot. The traditional finishing involves wrapping an additional strand around the end to create a tight binding,
then trimming the ends of the work strands to form a tassel. For ordinary use, a knot will hold fine, and you can still trim the ends for a tassel.
Uses for Braids:
Jewelry - Earrings, broach, neckpiece, cord for a pendant
Choker or Necklace
Coiled to make Earrings
Bracelet
Ankle Bracelet
Glasses Cord
Watchband or Wrist band
Purse handle or strap for a handbag
Hair ribbon or headband
Hat band or strap
Belt
Strings for a drawstring pouch
Trim for the edges of clothing
Attached to front of clothing in loops as closures, with buttons on the other side
Closure for a box or instrument case
Giftwrap ties
Obi: a sash used with modern traditional kimono dress in Japan
Tie-closures on little sacs
Straps for lingerie
Twisted, couched and knotted to make a closure on a jacket
Decoration on a garment (edging on a collar, along a seamline as piping)
Trim for the edges of cushions
Curtain tie-backs
Edge trim for lamp shades
Hiding seams on upholstered furniture
Lamp or Bell pulls
Bolo cord
Hanging plant holders
Coiled for rugs or floor mats
Bookmark
Camera or Binocular strap
Guitar strap
Keychain
Dog collar or leash
Horse reins, lead rope, headstall
Napkin rings
Sandal strap
Shoelaces
Suspenders
Use braids in any circumstance where you might ordinarily use a cord, or a ribbon, or a trim, or a woven band


